
| 일 | 월 | 화 | 수 | 목 | 금 | 토 |
|---|---|---|---|---|---|---|
| 1 | ||||||
| 2 | 3 | 4 | 5 | 6 | 7 | 8 |
| 9 | 10 | 11 | 12 | 13 | 14 | 15 |
| 16 | 17 | 18 | 19 | 20 | 21 | 22 |
| 23 | 24 | 25 | 26 | 27 | 28 | 29 |
| 30 | 31 |
- redis bloom filter
- hadoop
- 빅데이터플랫폼
- 개발자
- mlops
- dataengineer
- 하둡
- apache spark
- Data engineering
- 빅데이터
- 블로그
- Spark structured streaming
- BigData
- Terraform
- DataEngineering
- kubernetes
- 하둡에코시스템
- eks
- Python
- 추천시스템
- cloudera
- pyspark
- 클라우데라
- kafka
- spark
- AWS SageMaker
- 데이터엔지니어
- recommendation system
- 데이터엔지니어링
- 개발자혜성
- Today
- Total
Hyesung Oh
Pyspark 도입 후 고도화하기/ 2. Pyspark 작동 원리 feat. Py4J 본문
Pyspark 도입 후 고도화하기/ 2. Pyspark 작동 원리 feat. Py4J
혜성 Hyesung 2021. 11. 1. 22:45Spark가 JVM 위에서 동작하는 사실은 Spark 개발자라면 누구나 아는 사실입니다.
Pyspark 구동의 핵심 부분인 Python process와 JVM process간의 객체 레벨 통신에 대해서 궁금증이 생겼습니다.
아래 본문은 Pyspark 소스코드를 파헤치며 파악한 내용들이며 잘못된 내용에 대한 피드백 주시면 책임감을 가지고 수정하겠습니다.
Overview
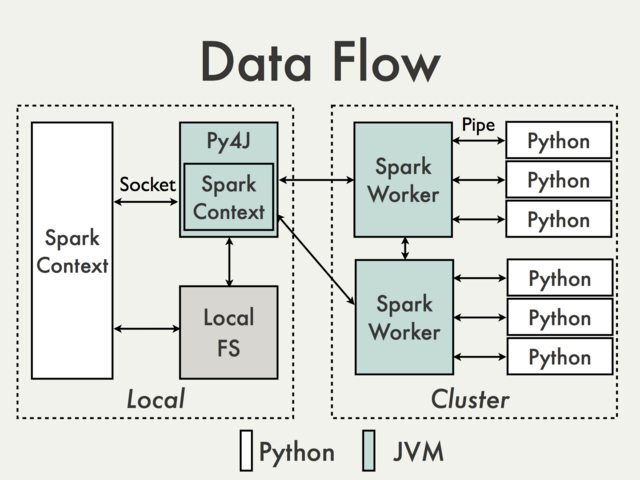
PySpark is built on top of Spark's Java API. Data is processed in Python and cached / shuffled in the JVM
The In the Python driver program, SparkContext uses Py4J to launch a JVM and create a JavaSparkContext. Py4J is only used on the driver for local communication between the Python and Java SparkContext objects; large data transfers are performed through a different mechanism.
RDD transformations in Python are mapped to transformations on PythonRDD objects in Java. On remote worker machines, PythonRDD objects launch Python subprocesses and communicate with them using pipes, sending the user's code and the data to be processed.
요약 하면
1. Python Process의 SparkContext 객체가 Py4j를 통해 JVM process를 실행하고 JavaSparkContext 객체를 생성한다.
2. Python Process에서의 RDD Transformation은 JVM process의 PythonRDD 객체에 매핑된다. PythonRDD object는 각 slave node의 JVM process 상에서 Python subprocess를 실행한다. 그리고 pipes를 이용해 해당 자식프로세스와 네트워킹한다.
3. 네트워킹시 user python code와 data가 serialization&deserialization 과정을 통해 자식프로세스로 전송된다.
Deep Dive into Python code
소스 코드를 보며 해당 내용이 어느정도 맞는지 검증하는 시간을 가졌습니다.
def getOrCreate(self):
    with self._lock:
        from pyspark.context import SparkContext
        from pyspark.conf import SparkConf
        session = SparkSession._instantiatedSession
        if session is None or session._sc._jsc is None:
            if self._sc is not None:
                sc = self._sc
            else:
                sparkConf = SparkConf()
                for key, value in self._options.items():
                    sparkConf.set(key, value)
                # This SparkContext may be an existing one.
                sc = SparkContext.getOrCreate(sparkConf)
            # Do not update `SparkConf` for existing `SparkContext`, as it's shared
            # by all sessions.
            session = SparkSession(sc)
        for key, value in self._options.items():
            session._jsparkSession.sessionState().conf().setConfString(key, value)
        return session
SparkSession은 SparkContext의 wrapper class일 뿐입니니다. 중점적으로 파악할 부분은 SparkContext, SparkSession이 initializing될 때 입니다.
SparkContext.getOrCreate(sparkConf)
@classmethod
def getOrCreate(cls, conf=None):
    with SparkContext._lock:
        if SparkContext._active_spark_context is None:
            SparkContext(conf=conf or SparkConf())
        return SparkContext._active_spark_context
현재 SparkContext 자원에 대해 lock을 acquire한 후 새 Context 생성여부를 판별합니다. 다음으로 SparkContext의 __init__ 부분을 확인해봐야할 것 같습니다.
def __init__(self, master=None, appName=None, sparkHome=None, pyFiles=None,
             environment=None, batchSize=0, serializer=PickleSerializer(), conf=None,
             gateway=None, jsc=None, profiler_cls=BasicProfiler):
    if (conf is not None and
        conf.get("spark.executor.allowSparkContext", "true").lower() != "true"):
        # In order to prevent SparkContext from being created in executors.
        SparkContext._assert_on_driver()

    self._callsite = first_spark_call() or CallSite(None, None, None)
    if gateway is not None and gateway.gateway_parameters.auth_token is None:
        raise ValueError(
            "You are trying to pass an insecure Py4j gateway to Spark. This"
            " is not allowed as it is a security risk.")

    SparkContext._ensure_initialized(self, gateway=gateway, conf=conf)
    try:
        self._do_init(master, appName, sparkHome, pyFiles, environment, batchSize, serializer,
                      conf, jsc, profiler_cls)
    except:
        # If an error occurs, clean up in order to allow future SparkContext creation:
        self.stop()
        raise
SparkContext._ensure_initialized
기존에 생성된 인스턴스가 있는지 한번 더 ensure합니다. 또한, JVM 실행여부를 판별하여, 없을 경우 실행합니다. JVM을 실행함은 결국, JVM에서 이미 실행중인 프로세스의 결과값(객체)들을 Python Process로 전송받아서 사용할 뿐이다 정도로 이해가 되었습니다.
@classmethod
def _ensure_initialized(cls, instance=None, gateway=None, conf=None):
    """
    Checks whether a SparkContext is initialized or not.
    Throws error if a SparkContext is already running.
    """
    with SparkContext._lock:
        if not SparkContext._gateway:
            SparkContext._gateway = gateway or launch_gateway(conf)
            SparkContext._jvm = SparkContext._gateway.jvm

        if instance:
            if (SparkContext._active_spark_context and
                    SparkContext._active_spark_context != instance):
                currentMaster = SparkContext._active_spark_context.master
                currentAppName = SparkContext._active_spark_context.appName
                callsite = SparkContext._active_spark_context._callsite

                # Raise error if there is already a running Spark context
                raise ValueError(
                    "Cannot run multiple SparkContexts at once; "
                    "existing SparkContext(app=%s, master=%s)"
                    " created by %s at %s:%s "
                    % (currentAppName, currentMaster,
                        callsite.function, callsite.file, callsite.linenum))
            else:
                SparkContext._active_spark_context = instance
launch_gateway
py4j JavaGateway를 return 하는 함수이며, JavaGateway는 set_gateway_client 함수를 내부적으로 호출하여 결과적으로 gateway_client를 인자로 가지는 JVMView를 인자로 가지고 있습니다. 즉, JVMView(=SparkContext._gateway._jvm)의 client가 직접적인 통신을 담당하며 통신에 필요한 credentials은 default 환경변수값을 사용하고 있는 것으로 확인이 됩니다.
if os.environ.get("PYSPARK_PIN_THREAD", "false").lower() == "true":
    gateway = ClientServer(
        java_parameters=JavaParameters(
            port=gateway_port,
            auth_token=gateway_secret,
            auto_convert=True),
        python_parameters=PythonParameters(port=0, eager_load=False))
else:
    gateway = JavaGateway(
        gateway_parameters=GatewayParameters(
            port=gateway_port,
            auth_token=gateway_secret,
            auto_convert=True
        ))
self._do_init
함수가 길기 때문에 블록별로 나누어 살펴보겠습니다.
def _do_init(self, master, appName, sparkHome, pyFiles, environment, batchSize, serializer,
             conf, jsc, profiler_cls):
    self.environment = environment or {}
    # java gateway must have been launched at this point.
    if conf is not None and conf._jconf is not None:
        # conf has been initialized in JVM properly, so use conf directly. This represents the
        # scenario that JVM has been launched before SparkConf is created (e.g. SparkContext is
        # created and then stopped, and we create a new SparkConf and new SparkContext again)
        self._conf = conf
    else:
        self._conf = SparkConf(_jvm=SparkContext._jvm)
        if conf is not None:
            for k, v in conf.getAll():
                self._conf.set(k, v)
self._initialize_context
# Create the Java SparkContext through Py4J
self._jsc = jsc or self._initialize_context(self._conf._jconf)
# Reset the SparkConf to the one actually used by the SparkContext in JVM.
self._conf = SparkConf(_jconf=self._jsc.sc().conf())
여기 부분에서 다소 혼란을 겪었습니다. 함수명만 봤을 때는 Python 측에서 JVM에 JavaSparkContext 객체를 생성하는 것 처럼 보일 여지가 있기 때문입니다. 하지만 이는 잘못되었습니다.
Note that the Java program must be started before executing the Python code above. In other words, the Py4J does not start a JVM.
Welcome to Py4J — Py4J
Welcome to Py4J Py4J enables Python programs running in a Python interpreter to dynamically access Java objects in a Java Virtual Machine. Methods are called as if the Java objects resided in the Python interpreter and Java collections can be accessed thro
www.py4j.org
문서에서도 설명하다시피, Python에서는 그저 JVM에서 실행중인 객체(데이터)를 불러와서 사용할 뿐입니다. 따라서 initialize_context라 함은, JVM의 SparkContext를 Python Driver의 SparkContext에 initialize하겠다는 말입니다. 이는 SparkContext._jsc 에서 접근이 가능합니다.
따라서 위의 The In the Python driver program, SparkContext uses Py4J to launch a JVM and create a JavaSparkContext. 라는 문장은 반은 맞고 반은 틀렸음을 알 수 있습니다. 정확히 정정하면, SparkContext use Py4J to initialize java_gateway and import SparkContext from JVM trhrough Py4J 이 맞을 것 같습니다.
제가 잘못이해한 부분이 있다면 댓글로 피드백 주시면 감사드리겠습니다.
일례로, spark-submit 시에 제출한 external jar의 경우 이미 JVM에서 실행되어 있고, 해당 파일을 PYSPARK에서 참조할 수 있게 path만 설정해주도록 구현이 되어있는 것을 확인할 수 있었습니다.
SparkSession.createDataFrame
그렇다면, Python object type으로 부터 createDateFrame을 호출할 때의 프로세스는 어떨지 궁금했습니다.
createDataFrame에 인자로 넘겨준 data의 타입이 pandas.DataFrame 일 경우 SparkConversionMixin에서 정의된 createDataFrame을 호출하여 전처리하도록 되어있는 것을 확인할 수 있습니다.
@since(2.0)
@ignore_unicode_prefix
def createDataFrame(self, data, schema=None, samplingRatio=None, verifySchema=True):
    SparkSession._activeSession = self
    self._jvm.SparkSession.setActiveSession(self._jsparkSession)
    if isinstance(data, DataFrame):
        raise TypeError("data is already a DataFrame")

    if isinstance(schema, basestring):
        schema = _parse_datatype_string(schema)
    elif isinstance(schema, (list, tuple)):
        # Must re-encode any unicode strings to be consistent with StructField names
        schema = [x.encode('utf-8') if not isinstance(x, str) else x for x in schema]

    try:
        import pandas
        has_pandas = True
    except Exception:
        has_pandas = False
    if has_pandas and isinstance(data, pandas.DataFrame):
        # Create a DataFrame from pandas DataFrame.
        return super(SparkSession, self).createDataFrame(
            data, schema, samplingRatio, verifySchema)
    return self._create_dataframe(data, schema, samplingRatio, verifySchema)
self._createDataFrame
전체적인 흐름만 놓고보면, Pyspark에서 DataFrame이란 JVM의 RDD에 schema를 입혀놓은 wrapper 클래스란 것을 확인할 수 있었습니다. 그리고 여기서 핵심인 self._createFromRDD 부분을 살펴보면
def _create_dataframe(self, data, schema, samplingRatio, verifySchema):
    if isinstance(schema, StructType):
        verify_func = _make_type_verifier(schema) if verifySchema else lambda _: True

        def prepare(obj):
            verify_func(obj)
            return obj
    elif isinstance(schema, DataType):
        dataType = schema
        schema = StructType().add("value", schema)

        verify_func = _make_type_verifier(
            dataType, name="field value") if verifySchema else lambda _: True

        def prepare(obj):
            verify_func(obj)
            return obj,
    else:
        prepare = lambda obj: obj

    if isinstance(data, RDD):
        rdd, schema = self._createFromRDD(data.map(prepare), schema, samplingRatio)
    else:
        rdd, schema = self._createFromLocal(map(prepare, data), schema)
    jrdd = self._jvm.SerDeUtil.toJavaArray(rdd._to_java_object_rdd())
    jdf = self._jsparkSession.applySchemaToPythonRDD(jrdd.rdd(), schema.json())
    df = DataFrame(jdf, self._wrapped)
    df._schema = schema
    return df
self._createFromRDD
결국 이런 저런 복잡한 과정을 거쳐 self._sc.parallelize(data)를 호출하는데
    def _createFromLocal(self, data, schema):
        """
        Create an RDD for DataFrame from a list or pandas.DataFrame, returns
        the RDD and schema.
        """
        # make sure data could consumed multiple times
        if not isinstance(data, list):
            data = list(data)

        if schema is None or isinstance(schema, (list, tuple)):
            struct = self._inferSchemaFromList(data, names=schema)
            converter = _create_converter(struct)
            data = map(converter, data)
            if isinstance(schema, (list, tuple)):
                for i, name in enumerate(schema):
                    struct.fields[i].name = name
                    struct.names[i] = name
            schema = struct

        elif not isinstance(schema, StructType):
            raise TypeError("schema should be StructType or list or None, but got: %s" % schema)

        # convert python objects to sql data
        data = [schema.toInternal(row) for row in data]
        return self._sc.parallelize(data), schema
self._sc.parallelize(data) 의 self._serialize_to_jvm
여기가 핵심임을 알 수 있었습니다.
    def parallelize(self, c, numSlices=None):
        """
        Distribute a local Python collection to form an RDD. Using xrange
        is recommended if the input represents a range for performance.

        >>> sc.parallelize([0, 2, 3, 4, 6], 5).glom().collect()
        [[0], [2], [3], [4], [6]]
        >>> sc.parallelize(xrange(0, 6, 2), 5).glom().collect()
        [[], [0], [], [2], [4]]
        """
        numSlices = int(numSlices) if numSlices is not None else self.defaultParallelism
        if isinstance(c, xrange):
            size = len(c)
            if size == 0:
                return self.parallelize([], numSlices)
            step = c[1] - c[0] if size > 1 else 1
            start0 = c[0]

            def getStart(split):
                return start0 + int((split * size / numSlices)) * step

            def f(split, iterator):
                # it's an empty iterator here but we need this line for triggering the
                # logic of signal handling in FramedSerializer.load_stream, for instance,
                # SpecialLengths.END_OF_DATA_SECTION in _read_with_length. Since
                # FramedSerializer.load_stream produces a generator, the control should
                # at least be in that function once. Here we do it by explicitly converting
                # the empty iterator to a list, thus make sure worker reuse takes effect.
                # See more details in SPARK-26549.
                assert len(list(iterator)) == 0
                return xrange(getStart(split), getStart(split + 1), step)

            return self.parallelize([], numSlices).mapPartitionsWithIndex(f)

        # Make sure we distribute data evenly if it's smaller than self.batchSize
        if "__len__" not in dir(c):
            c = list(c)    # Make it a list so we can compute its length
        batchSize = max(1, min(len(c) // numSlices, self._batchSize or 1024))
        serializer = BatchedSerializer(self._unbatched_serializer, batchSize)

        def reader_func(temp_filename):
            return self._jvm.PythonRDD.readRDDFromFile(self._jsc, temp_filename, numSlices)

        def createRDDServer():
            return self._jvm.PythonParallelizeServer(self._jsc.sc(), numSlices)

        jrdd = self._serialize_to_jvm(c, serializer, reader_func, createRDDServer)
        return RDD(jrdd, self, serializer)
def _serialize_to_jvm(self, data, serializer, reader_func, createRDDServer):
if self._encryption_enabled:
# with encryption, we open a server in java and send the data directly
server = createRDDServer()
(sock_file, _) = local_connect_and_auth(server.port(), server.secret())
chunked_out = ChunkedStream(sock_file, 8192)
serializer.dump_stream(data, chunked_out)
chunked_out.close()
# this call will block until the server has read all the data and processed it (or
# throws an exception)
r = server.getResult()
return r
else:
# without encryption, we serialize to a file, and we read the file in java and
# parallelize from there.
tempFile = NamedTemporaryFile(delete=False, dir=self._temp_dir)
try:
try:
serializer.dump_stream(data, tempFile)
finally:
tempFile.close()
return reader_func(tempFile.name)
finally:
# we eagerily reads the file so we can delete right after.
os.unlink(tempFile.name)즉, SparkSession.createDataFrame의 결과물은 jrdd를 wrapping하고 있는 python RDD 클래스이며, 넘겨준 data 값은 JVM으로 serialized 되어 전송됨을 확인할 수 있었습니다. jrdd는 전송 후 받은 리턴 값입니다. jrdd 객체의 id 맴버 변수값을 통해 식별을 하고 있고 있는 것으로 확인이 되었습니다.
여기서맨 아래 try, finally 구문을 집고 넘어가보면, 데이터 사이즈가 클 경우 이를 tmp_dir에 파일로 쓴 후(serializer.dump_stream(data, tempFile) 이를 JVM에서 읽어서(reader_func) parallelize 하는 방식으로 구현되어 있다는 점입니다.
def reader_func(temp_filename):
    return self._jvm.PythonRDD.readRDDFromFile(self._jsc, temp_filename, numSlices)
Summary
1. 본문에선 다루지 않았지만, 실제 JVM에서 Python subprocess가 실행되는 과정은 아래와 같다.
- SparkContext on Python Driver에서 JVM에 user code와 data를 전송
- JVM의 PythonRDD 객체는 python subprocess를 실행하며 pipe를 통해 입출력 핸들링. PythonRDD는 각 stage에 매핑
2. 결국 Java 객체만으로 처리할 수 없는 로직을 적용해야하고 데이터 사이즈가 많은 경우 성능상 이슈가 있을 수 밖에 없다.
- ex) python code로 정의한 UDF의 경우 python process에서만 처리될 수 있으므로, number of rows * 데이터전송 처리 부하가 걸려 큰 병목으로 작용한다.
- 따라서 이 경우 pandas vetorized UDF를 활용하면 성능상의 이슈를 극복할 수 있다고는 하나, 이는 아직까지 유즈 케이스가 한정적인 것 같다.
3. 따라서 Pyspark DataFrame API만을 최대한 활용하여 처리하는게 바람직하다.
소스코드가 워낙 방대하고 앞으로 파악해나가야할 부분이 아직 정말 많이 남아있습니다. 하지만, Pyspark의 기본적인 작동원리와 소스코드의 구동 흐름을 소스 코드를 보며 이해해보는 측면에서 갚진 시간이었습니다.
긴 글 읽어주셔서 감사합니다. 피드백이나 제언은 댓글로 남겨주시면 감사드리겠습니다.
'Data Engineering > Apache Spark' 카테고리의 다른 글
| Long running Spark Job Problem: NodeManager is unhealthy (0) | 2022.04.27 |
|---|---|
| Pyspark 도입 후 고도화하기/ 4. Optimization feat. spark-default.conf (0) | 2021.11.02 |
| Pyspark 도입 후 고도화하기/ 3. 가독성 높이기 feat. transform spark3.0 (0) | 2021.11.01 |
| Pyspark 도입 후 고도화하기/ 1. 프로젝트 구조 (0) | 2021.11.01 |
| spark-shell 실행 메커니즘 이해하기 (0) | 2021.01.22 |
